Creating Original Recurring Characters for Your eLearning Course
At the E-Learning Heroes Roadshow in Denver (September 10-11), I presented a session about Creating Original Recurring Characters for Your Course on a Budget. This is a summary of the methods I discussed to help developers (not necessarily graphic designers) create characters for elearning courses with little-to-no budget, from easiest to intermediate/advanced:
1. Stock Photos / Artists for Hire
![]()
While you can’t always find what you need in stock photos for recurring characters, the artists that create the images can create them for you. If you search through stock images and find an artist’s style you like, you can contact the artist directly and ask if they can create new images for you. My attempt at this yielded a response of $5/image to create a custom image of a 3-D rendered character (such as in the style shown at right). If you have a shot list/storyboard and know what images you need for your project, these type of image using a recurring character can be had fairly inexpensively.
There are also sites like Fiverr that you can search artists’ styles and find someone willing to also draw custom images for you for $5 each.
2. Articulate Illustrated Characters + Clip Art
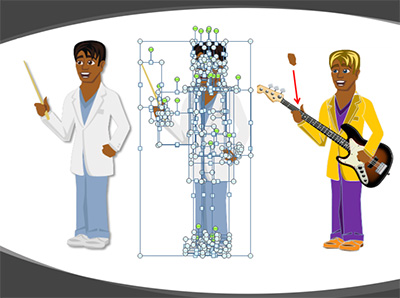
Since Articulate Studio ’13 (Presenter ’13) includes the ability to insert their included illustrated characters into your course (the same ones found in Storyline), you can ungroup the characters (via PowerPoint, right-click, ungroup repeatedly until all elements are separated), which allows you to modify individual elements.
As shown in the example at right, when ungrouped, you can change clothes, eye color, hair color, skin color, remove items completely, or add new items in using clip art (such as the guitar). 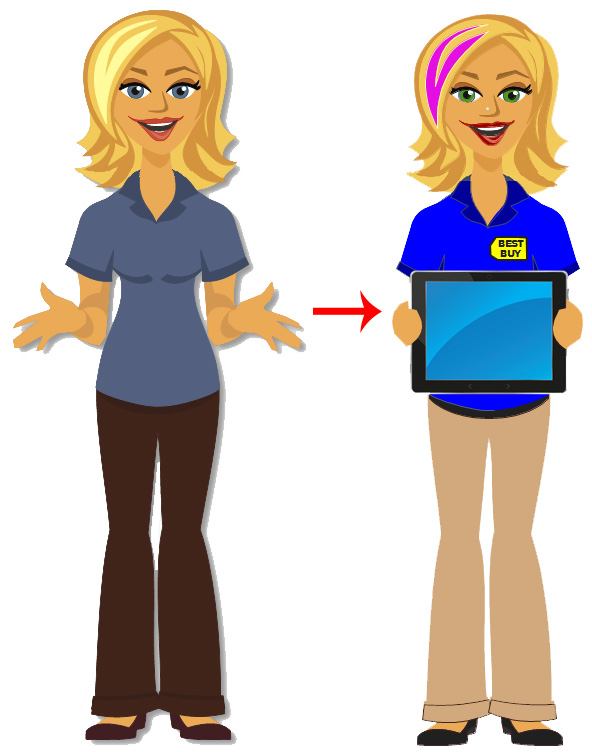 Here is an animated example of what you can do with this type of editing.) Using the illustrated characters poses and expressions, you can even bring in elements from other characters or facial expressions to create a completely unique character that you can reuse in new projects, and just change wardrobe, pose, or facial expression as the new project dictates.
Using this method allows you the freedom of creating characters that even have your company uniform, such as the example at left.
3. Photography
Essentially everyone has access to a digital camera these days (cell phone, point and shoot, DSLR). If stock photos don’t have what you need, you can use photography to create your own background for scenes (incorporating photographic or illustrated characters into them), or even take people you know (from your workplace) to create the scenes you need. If you have a shot list/storyboard, find a suitable location to photograph the scenes you need.
 As an example, for a course I worked on that required a bowling alley backdrop, I simply called the closest bowling alley to me and asked the manager if i could come down and take a few photos inside for a training course. I was using my own illustrated characters for this particular course, so when I was done getting my photos, I ended up with the examples at right, which meant I didn’t have to draw multiple scenes from a bowling alley.
4. Pictograms
![]()
The pictogram method was illustrated by Articulate Community Manager Mike Taylor and referenced in Tom Kuhlman’s
Rapid E-Learning Blog: Create Your Own Custom Characters for Online Training. This method involves using simple shapes you can create in PowePoint and Storyline to build characters and objects.
I don’t want to steal their thunder, so check out the link to see a video demonstration, as well as download sample images.
5. Drawing Your Own Characters
This method is clearly the most time-consuming and requires some artistic ability and the right software. However, the benefits are truly unique characters you can update and reuse.
In the examples I’ll show, I used Adobe Flash to draw my characters. I used Flash because A) I didn’t have Adobe Illustrator, B) using a vector drawing program allowed me to resize the artwork without losing quality, and C) I liked the line-smoothing feature Flash gives me to “clean up” my images. You could do similar work using a simple graphics editing program (like Adobe Photoshop), and there are also free alternatives (see below for a list of possible programs you can use).
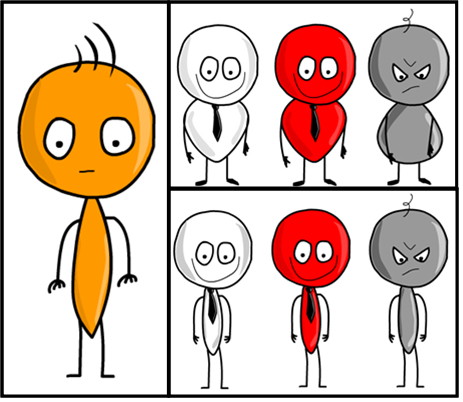 I based my drawings on the stick figure concept, which would be the easiest to draw. Practice using your drawing program, and create layers for each different body element so you can delete/fix items individually without affecting the rest of your image. You may go through several iterations before settling on something you (and your stakeholders) approve (as shown in my example at right). By keeping the design simple, you can create multiple expressions and simple body movements with little effort.
Here are 3 videos I created to show how simple it can be to draw your own characters. These were all done in real time and show (1) drawing a face, (2) drawing a body, and (3) creating a new facial expression:
https://www.youtube.com/watch?v=iBZIQggWZwM&feature=youtu.be
https://www.youtube.com/watch?v=OX8p4xVbQcU&feature=youtu.be
https://www.youtube.com/watch?v=8tYltyNFfQA&feature=youtu.be
Software
There are several free and paid types of software you can use to create your own images or edit images.
For photo and image editing, and also the ability to draw your own (raster, not vector) images:
- Adobe Photoshop
- Corel PaintShop Pro
- GIMP (free)
- paint.net (free)
To create vector illustrations (as shown in my above examples):
- Adobe Illustrator
- CorelDRAW & PHOTO-PAINT Essentials
- Adobe Flash
- Inkscape (free)
- SketchUp (free) – to create 3-D renderings, background, and buildings (including importable, pre-designed items from a library)
This is certainly not an all-encompassing list, but can point you in the right direction!
Good luck!
Thank you for sharing Bob. I am just starting to get better at creating characters using shapes in PowerPoint and then saving them as a PNG. But your comments about using a vector drawing program to create the characters make sense since responsive design is now a reality for those of us who are non-coders. It’s a lot of work to create a character! I want to reuse them in all media. Good tips.
Thanks for checking it out, Lori!